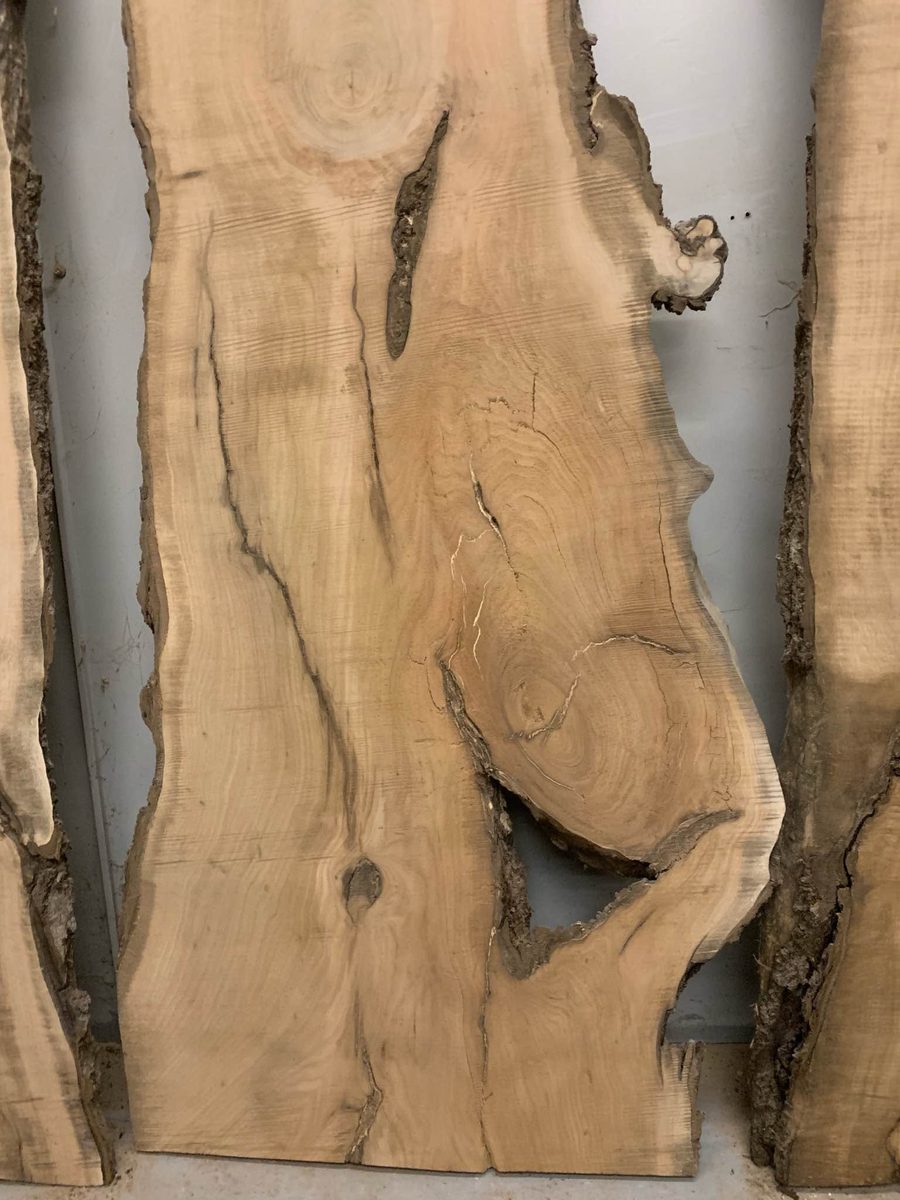
How to Fill Cracks and Voids in a Live Edge Slab with Epoxy
A practical guide to epoxy fills in live edge slabs: which defects to fill, deep-pour vs. tabletop epoxy, sealing and taping, pouring in layers, and flattening.
Quick answer: To fill cracks and voids in a live edge slab, start with dry, roughly flattened wood. Clean out loose bark and debris, seal the bare wood inside each void with a thin coat of epoxy, and tape the underside and open edges so nothing leaks. Use thin or tabletop epoxy for fine checks and shallow holes, and a slow-curing deep-pour epoxy for deeper voids, poured in layers no thicker than the manufacturer allows. Pop bubbles with a quick pass of heat, overfill slightly, let the epoxy cure completely, then flatten and sand it flush before finishing.
Almost every live edge slab has a few openings: drying checks at the ends, a loose knot, a pocket of ingrown bark, a worm track in the sapwood. Those features are part of the appeal of natural-edge wood, but left open they collect dust and crumbs, snag rags, and interrupt a finished surface. Epoxy is the standard fix, and a good fill reads as part of the wood rather than a patch. A bad one shows up as cloudy resin, a halo of bubbles, a puddle on the shop floor, or a fill that cracked from its own heat. The difference is mostly preparation and patience. This guide covers fills inside a slab, not full river table pours.
Which cracks and voids should you fill?
Not every opening needs resin. Tiny surface checks in a dry slab can often be wicked full of thin CA glue and sanded flush. Larger defects are good candidates for epoxy:
- End checks and drying cracks open enough to hold debris
- Knot holes and loose knots, which can be locked in place or filled clear
- Bark inclusions, pockets of bark the tree grew around, usually loose and crumbly
- Through-voids that run from the top face to the bottom
- Insect galleries and punky edges, once soft wood has been removed or hardened
Epoxy fills a gap, but it does not hold a crack closed. If a crack crosses a span or has been opening wider, stabilize it with butterfly keys first, then fill it.
What kind of epoxy should you use?
The choice comes down to depth, because epoxy gives off heat as it cures. That reaction, called exotherm, feeds on itself: a thick mass holds its heat, the heat speeds the cure, and the faster cure makes more heat. Pour too much fast-setting epoxy at once and it can crack, cloud, foam, or yellow, and a large confined mass can get hot enough to be a burn and fire hazard.
Thin and penetrating epoxy
Low-viscosity epoxies wick into fine cracks and porous wood. Use them for hairline checks, for sealing the inside of a void before the main fill, and for hardening soft or spalted areas.
Tabletop and coating epoxy
Thicker and faster-curing, these are made to go on in thin layers. They suit shallow holes and narrow cracks built up a layer at a time, and they make a good seal coat.
Deep-pour casting epoxy
Deep-pour resins cure slowly so the heat has time to escape, which lets them fill much thicker sections in one pour. The tradeoff is time: they can stay liquid for hours and take days to reach full hardness. Many also have a minimum depth and may not cure properly if poured too thin.
Pour depths, mix ratios, working temperatures, and cure times vary widely between products, so read the manufacturer's technical data sheet and follow it. If a void is deeper than the rated depth, fill it in several layers.
What tools and materials do you need?
- A dry slab, ideally kiln-dried to a stable moisture content
- Epoxy matched to the depth of your voids, graduated mixing cups or a digital scale, and flat mixing sticks
- Aluminum foil tape or sheathing tape for the underside and edges; epoxy tends to creep under painter's tape
- Scrap wood or melamine for dams, covered with packing tape or release agent so the epoxy will not bond to it
- Dental picks, a wire brush, a small chisel, and a shop vacuum or compressed air
- Epoxy pigment or mica powder for tinted or black fills
- A heat gun or small torch for releasing bubbles
- Nitrile gloves, eye protection, ventilation, and any respirator the product calls for
- A router sled, plane, card scraper, and random-orbit sander for leveling
How do you fill cracks and voids with epoxy, step by step?
- Start with dry, rough-flattened wood. Epoxy bonds poorly to wet wood, and moisture escaping from a slab can push bubbles into a fill. Rough-flatten first so you can see the true depth of each defect; our guide to flattening a slab with a router sled covers that step.
- Clean out every void. Pick out loose bark, dirt, and crumbly wood until you reach sound fibers, then vacuum out the dust. Anything left behind will float up into the resin or leave a weak spot. If you want to keep a tight bark inclusion, harden it with thin epoxy or CA glue.
- Seal the bare wood. Brush a thin coat of epoxy onto the walls of each void and let it set up. Porous wood and end grain hold air, and as resin soaks in, that air escapes as a stream of small bubbles. A seal coat stops most of it.
- Tape and dam. Cover the underside of every crack and through-hole with foil tape, burnished down firmly. Where a void breaks through the live edge, clamp a lined scrap against the opening as a dam.
- Warm the shop and materials. Keep the slab and resin within the temperature range on the data sheet. Cold epoxy is thick and holds bubbles, while a hot shop can push a fast epoxy toward runaway heat.
- Mix carefully. Measure exactly as directed, by volume or weight. Stir slowly and thoroughly, scraping the sides and bottom of the cup, and add pigment now if you are using it. Pour soon after mixing, since epoxy left in the cup heats up fastest.
- Pour in layers. For through-voids, pour a thin first layer to seal the bottom and let it gel before filling the rest. Keep each layer within the product's depth limit, and work resin into fine cracks with a stick or syringe so it reaches the bottom.
- Release bubbles. Pass a heat gun or torch quickly over the surface to bring bubbles up and pop them. Keep it moving and stop before the resin gels; lingering scorches wood and overheats epoxy. Check back over the next while, since a few stragglers can keep rising.
- Top up and overfill. Resin settles as it soaks in and finds hidden channels. Add more as needed, and leave the final layer slightly proud of the surface.
- Let it cure fully. Wait the full time on the data sheet, longer in a cool shop. Epoxy feels hard well before it is fully cured, and sanding too early gums up the paper and can pull the fill.
- Flatten and sand it flush. Cut back the overfill with a router sled, plane, or scraper, then sand wood and epoxy together through your grits. Keep the sander moving: wood beside a fill cuts faster than the resin and can dish.
- Finish over the cured fill. Most wood finishes go on well over cured, sanded epoxy, but test yours on a scrap with a fill first. Our guide to caring for and finishing live edge slabs covers the rest.
Should epoxy fills be clear, black, or tinted?
Clear resin shows the depth of a void and the bark texture inside it, but it also shows every bubble and fleck of debris. Black or dark epoxy hides imperfections, reads like a natural shadow in walnut and other dark woods. Tinting to match the wood can make small fills nearly disappear. Test colors on scrap, since they shift as epoxy cures and again under finish.
What mistakes should you avoid when filling a slab?
- Filling a slab that is not fully dry
- Pouring deeper than the epoxy is rated for, or using fast tabletop epoxy in a deep void
- Skipping the seal coat and getting a cloud of bubbles from porous walls
- Trusting painter's tape on the underside and losing the pour
- Guessing at the mix ratio, which can leave soft spots that never cure
- Holding a heat gun or torch in one place too long
- Sanding before the epoxy has fully cured
- Expecting epoxy alone to hold a moving crack together
Looking for a slab with natural character to work on? Browse kiln-dried slabs and burls in the shop, or come see them in person at the yard in Sharon, VT. We also ship freight to the contiguous 48 states; the shipping page explains how. For cracks that need more than a fill, read our guide to cutting and installing butterfly keys, and for figured stock, see our guides to burls and spalted wood.
FAQ: filling cracks and voids with epoxy
Can you fill cracks in a live edge slab with epoxy?
Yes. Epoxy is the standard way to fill drying checks, knot holes, bark pockets, and through-voids in a dry slab. Clean and seal the void, tape the underside, pour within the product's depth limit, and sand flush after a full cure.
What is the difference between deep-pour and tabletop epoxy?
Tabletop epoxy is thicker, cures faster, and is meant for thin layers and coatings. Deep-pour epoxy cures slowly so heat can escape, which lets it fill thicker sections in one pour. Each product lists its own depth limits on its data sheet.
How deep can you pour epoxy in one layer?
It depends entirely on the product. Some coating epoxies are limited to thin layers, while deep-pour resins are rated for much thicker pours. Follow the manufacturer's data sheet and fill deeper voids in several layers.
Why does epoxy get hot or crack in a deep void?
Curing epoxy produces heat, and a thick mass traps it, which speeds the reaction and makes more heat. Too much fast-curing epoxy in one pour can crack, cloud, or yellow. Use the right epoxy and pour in layers.
How do you keep bubbles out of an epoxy fill?
Seal the wood inside the void with a thin coat first, keep the resin and shop warm, mix slowly, and pass a heat gun or torch quickly over the surface before the epoxy gels.
Does epoxy stop a crack from growing?
Not reliably. Epoxy fills the gap, but wood keeps moving with humidity. Stabilize active or structural cracks with butterfly keys, then fill them.