What Is Spalted Wood? How to Choose, Stabilize, and Finish It
A practical guide to spalted wood: what causes zone lines and color, how to judge soundness, and how to stabilize, flatten, sand, and finish spalted slabs.
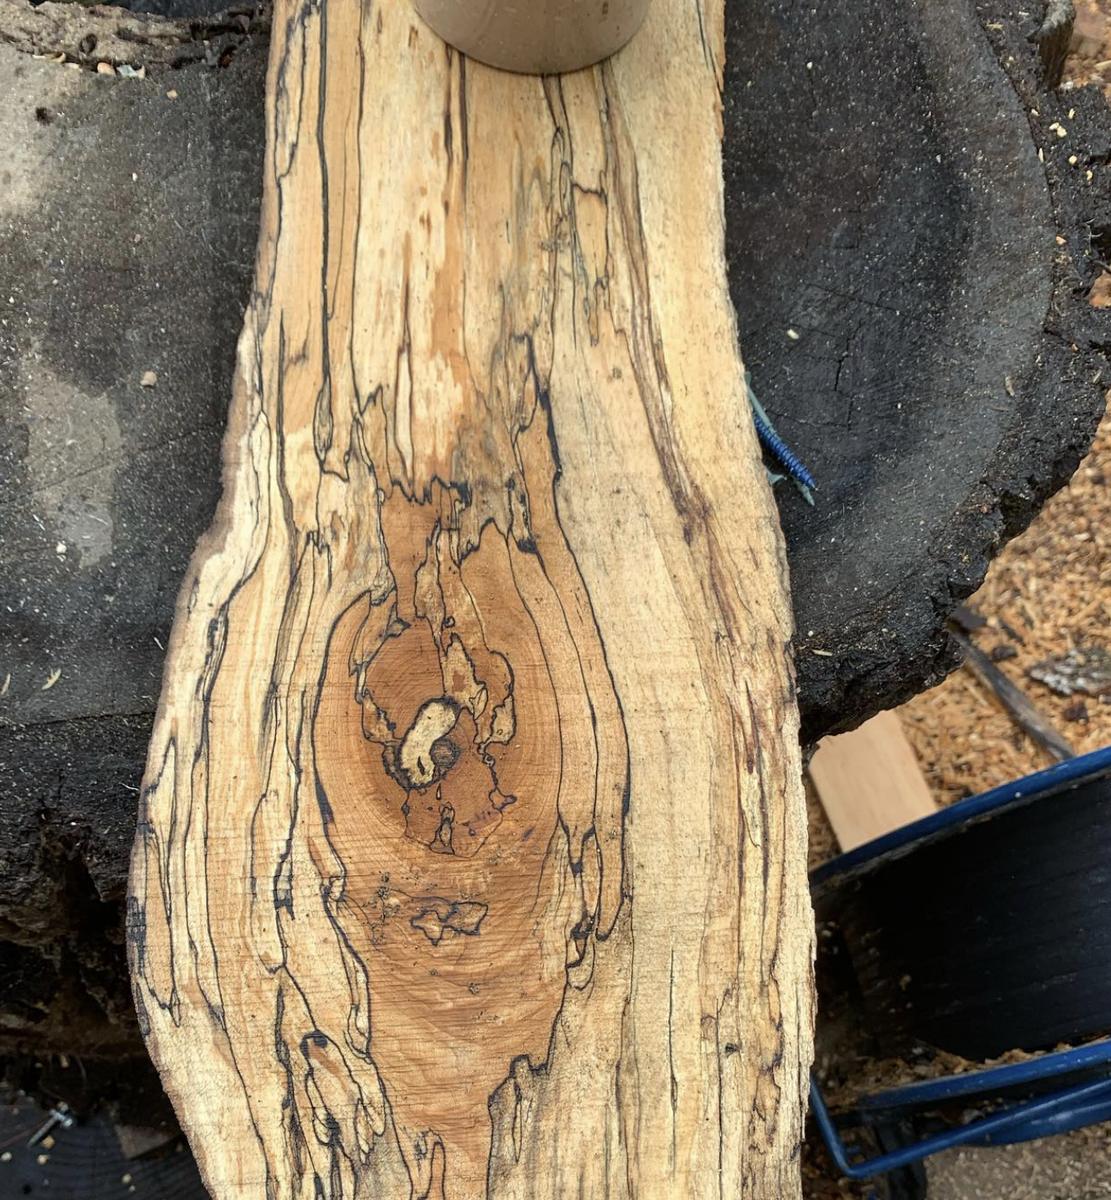
Quick answer: Spalted wood is wood that fungi began to colonize before it was dried, leaving black zone lines, patches of color, or bleached areas. The figure is beautiful, but the same fungi that make it also start decay, so the job is to buy or keep only wood that is still sound. Make sure the piece is fully dry so the fungi are dormant, probe for soft spots, harden any punky areas with a penetrating stabilizer, sand with sharp abrasives and good dust control, and seal before applying finish so soft and hard areas take it evenly.
Spalting sits right on the line between figure and rot. Catch it at the right stage and you get dark ink lines and soft color running through pale wood, a look no stain can fake. Let it go too far and the wood turns to something closer to cork. For furniture makers and turners, the skill is telling those two apart, then working spalted stock in a way that respects its uneven hardness. This guide covers what causes spalting, how to judge a spalted slab, and how to stabilize, machine, and finish it.
What causes spalting in wood?
Spalting is the visible result of fungi colonizing wood, usually in a fallen tree or a log left lying in warm, damp conditions. As different fungi spread through the wood, they compete for territory and nutrients, and that competition shows up as pattern. Woodworkers generally sort spalting into three types, and a single board often shows more than one:
- Zone lines. The thin black or dark brown lines most people picture when they hear "spalted." They form where fungi wall themselves off from competing colonies, laying down dark, dense pigment along the boundary.
- Pigmentation. Patches or streaks of color left by certain fungi. Grays, pinks, and browns are common, and a few fungi stain wood blue-green.
- Bleaching. Lighter areas where white rot fungi have broken down lignin, the compound that gives wood much of its color and stiffness. Bleached zones are often the softest part of the board.
That last point is the key to working spalted wood. Zone lines and color are mostly cosmetic, but bleaching is decay in progress. The more a piece has been bleached and softened, the weaker it is.
Which woods spalt best?
Light-colored hardwoods with little natural decay resistance spalt most readily and show the figure best, because the dark lines contrast with pale wood. Maple is the classic, and birch, beech, sycamore, hackberry, and box elder are also known for it. Darker, more decay-resistant species such as walnut, cherry heartwood, and white oak spalt less often, and when they do, the lines are harder to see against the background color. Sapwood of almost any species spalts more readily than its heartwood.
How do you tell good spalting from rotten wood?
A spalted piece is worth working when it is dry and mostly firm. The checks below take a few minutes and can save you from building with wood that will crumble under a chisel or a load.
Press, probe, and listen
- Probe the light areas. Push a thumbnail or an awl into bleached and discolored zones. Firm wood resists and leaves a small, clean dent. Punky wood lets the point sink in easily and feels spongy.
- Tap it. Knock along the surface with a knuckle or a mallet. Sound wood rings with a fairly crisp tone; badly decayed wood sounds dull and dead.
- Check the weight. A spalted slab that feels much lighter than you expect for its species and size has likely lost a lot of material to decay.
- Look at the edges and ends. Crumbling end grain, deep soft pockets, and stringy, fibrous areas mean the decay has gone further than the face suggests.
- Confirm it is dry. A moisture meter reading in the range for furniture work tells you the fungi have stopped growing. Wood stays at risk of further decay as long as it stays wet.
Small soft spots are normal and fixable. A slab that is soft across most of its area belongs in the firewood pile or the turning-blank bin, not under a tabletop.
Is spalted wood safe to work with?
Treat spalted wood dust with more care than ordinary hardwood dust. Spalted wood can carry fungal spores, and fine dust from any wood can irritate the lungs, eyes, and skin. Run dust collection at the source, wear a well-fitted respirator rated for fine particles rather than a loose paper mask, and clean up with a shop vacuum instead of a broom. People with asthma, allergies, or compromised immune systems should be especially cautious. Thorough drying, and kiln drying in particular, stops the fungi from growing, but it does not make the dust harmless.
What tools and materials do you need?
- Moisture meter and an awl for checking soundness
- Dust collection, a shop vacuum, and a fine-particle respirator
- Penetrating stabilizer: thin CA glue for small spots, or a low-viscosity penetrating epoxy for larger areas
- Sharp plane irons, scrapers, or router bits; dull edges crush and tear soft fibers
- Fresh sandpaper in a progression of grits, plus a hard sanding block
- Dewaxed shellac or a thinned coat of your topcoat for sealing
- Your chosen finish, such as an oil-based varnish, wiping varnish, or hardwax oil
How do you stabilize and finish a spalted slab, step by step?
- Dry it fully. Start with wood at a stable moisture content suited to indoor furniture. Drying stops the fungi and keeps the soft areas from getting worse. If you are unsure what that means in practice, our guide to why kiln-dried slabs matter explains it.
- Map the soft spots. Probe the whole face and both edges and mark every area that gives under an awl. These are the areas to harden before any serious machining.
- Harden the punky areas. Flood small soft spots with thin CA glue and let it wick in. For larger areas, brush or pour on a low-viscosity penetrating epoxy and keep it wet until the wood stops drinking. Let it cure completely. Small turning blanks can be vacuum-stabilized with a heat-cured resin, but that takes a vacuum chamber and an oven and is not practical for slabs.
- Flatten with sharp tools. Take light passes. Hard and soft areas cut differently, and a dull edge tears out the soft zones and leaves the hard ones standing. A router sled with a sharp surfacing bit handles spalted slabs well; see our guide to flattening a slab with a router sled.
- Fill cracks and voids. Fill checks and holes with epoxy, and add butterfly keys across any crack that could keep growing. Key into firm wood, not punky areas.
- Sand on a hard block. Use a hard block or a random-orbit sander with a firm pad so you do not scoop out the soft zones. Change paper often, and vacuum the surface between grits so dark dust from the zone lines does not get packed into the pale wood around them.
- Seal before you finish. Apply a thin coat of dewaxed shellac or a thinned coat of your topcoat. Soft, bleached areas soak up finish much faster than firm wood, and a seal coat evens out that absorption so the surface does not blotch.
- Build the finish. Apply your topcoat in thin layers, sanding lightly between coats. Oil-based finishes warm the color and deepen the contrast of the zone lines. Water-based finishes keep pale wood paler. Test both on an offcut or the underside first.
Is spalted wood strong enough for furniture?
It depends on the piece and the job. A sound, lightly spalted board performs close to unspalted wood and is fine for tabletops, panels, boxes, and shelves with modest spans. Heavily bleached wood has lost real strength and should not be used where it carries a load across a span, such as a bench seat, a long shelf, a chair part, or a leg. When in doubt, put spalted stock where it is supported along its length and seen, and use sound wood for the structure.
What mistakes should you avoid with spalted wood?
- Buying or building with wood that is still wet, which lets decay keep going
- Skipping the probe test and finding the soft spots with a router bit
- Machining punky areas before stabilizing them, which tears them out
- Sanding with worn paper or a soft pad, which dishes the soft zones
- Smearing dark zone-line dust into the light wood around it
- Applying finish without a seal coat and getting a blotchy surface
- Using heavily spalted wood for legs, seats, or long unsupported spans
- Working without dust collection or a proper respirator
Looking for wood with character for your next build? Browse kiln-dried slabs and burls in the shop, or see them in person at the yard in Sharon, VT. We also ship freight to the contiguous 48 states; the shipping page explains how it works. If figured wood is your thing, our guide to choosing and working with burls is a good next read, and caring for and finishing live edge slabs covers long-term care.
FAQ: spalted wood
What is spalted wood?
Spalted wood is wood that fungi colonized before it was dried. The fungi leave dark zone lines, patches of color, or bleached areas that give the wood its distinctive figure.
Is spalted wood rotten?
Spalting is an early stage of decay. Wood with zone lines and color but firm fibers is sound and workable. Wood that is soft, spongy, or crumbly across large areas has gone too far.
Does spalting keep spreading after the wood is cut?
Fungi need moisture to grow. Once wood is dried to a stable indoor moisture content, the fungi go dormant and the spalting stops progressing. If the wood gets wet again for long periods, decay can resume.
What is the best way to stabilize soft spots in spalted wood?
Use thin CA glue for small spots and a low-viscosity penetrating epoxy for larger areas, applied until the wood stops absorbing it. Vacuum stabilizing with heat-cured resin works for small pieces such as turning blanks.
What finish works best on spalted wood?
Most finishes work well over a seal coat of dewaxed shellac or thinned topcoat. Oil-based finishes warm the color and boost the contrast of the zone lines; water-based finishes keep pale wood lighter.
Is spalted wood dust dangerous?
Spalted wood dust can carry fungal spores, and fine wood dust irritates the lungs and skin. Use dust collection and a fine-particle respirator, and take extra care if you have asthma or allergies.