What Is Burl Wood? How to Choose and Work with Burls
A practical guide to burl wood: what causes burls, eye and swirl figure, slabs versus cookies, and how to stabilize, flatten, and finish burl without tear-out.
Quick answer: A burl is a rounded outgrowth on a tree's trunk or limb, packed with dormant buds and tangled grain. That chaotic grain gives burl wood its eye and swirl figure, and it is also what makes burl tricky: it can check as it dries, tear out under a planer, and soak up finish unevenly. Choose dry, sound pieces, stabilize cracks and voids, flatten with light cuts, scrape and sand rather than plane, and seal the wood before the final finish.
Few materials stop people in a shop the way a good burl does. The figure seems to move as you walk past it, and no two pieces look alike. The same qualities that make burl so striking also make it less forgiving than a straight-grained board. This guide explains what a burl actually is, how to read one before you buy it, and how furniture makers, turners, and DIY woodworkers can stabilize, flatten, and finish burl wood without fighting it every step of the way.
What is a burl?
A burl is a swollen, often lumpy growth on the side of a tree trunk, at its base, or on a large limb. It forms when the tree responds to some kind of stress, such as an injury, insect activity, or a fungal or bacterial infection, though the exact trigger is often unknown. Inside, the growth is made of a dense mass of dormant buds that never became branches. Each bud leaves a tiny knot behind, and the wood fibers twist and fold around them as the tree keeps growing.
The result is wood with no single grain direction. In a normal board the fibers run more or less parallel along the length. In a burl they run every which way, which is exactly why light dances across the surface once it is finished.
Not every bump on a tree is a burl. Some are healed-over wounds or galls with little figure inside, and you often cannot tell until the wood is cut. Removing a burl from a living tree leaves a large wound that can weaken or kill it, so most burl wood comes from trees that have fallen or were already being taken down. When you buy, it is fair to ask where a piece came from.
What do burl eyes and swirls mean?
Burl figure falls into two broad types, and many pieces show some of both.
- Eye figure: clusters of small, dark dots, each one the trace of a dormant bud. Tightly packed eyes are what many people picture when they hear the word burl.
- Swirl figure: wavy, contorted grain with few obvious eyes. It reads more like rippling water or smoke than a field of dots.
The direction of the cut changes what an eye burl shows. A cut running roughly parallel to the trunk tends to expose the eyes face-on, while a cut straight across the trunk tends to show lines radiating outward from the center. Swirl figure looks random whichever way it is sawn. Occasionally a burl that looked promising from the outside turns out to have very little figure at all, which is one reason buying sawn and dried stock takes the gamble out of it.
Which species grow burls?
Many species form burls. In North America, maple, walnut, cherry, elm, ash, oak, birch, redwood, and buckeye are all known for them, and maple burl is probably the most familiar to woodworkers. Color and hardness follow the species, so a cherry burl works and ages like cherry and a maple burl like maple, just with far wilder grain.
Burl slab or burl cookie: what is the difference?
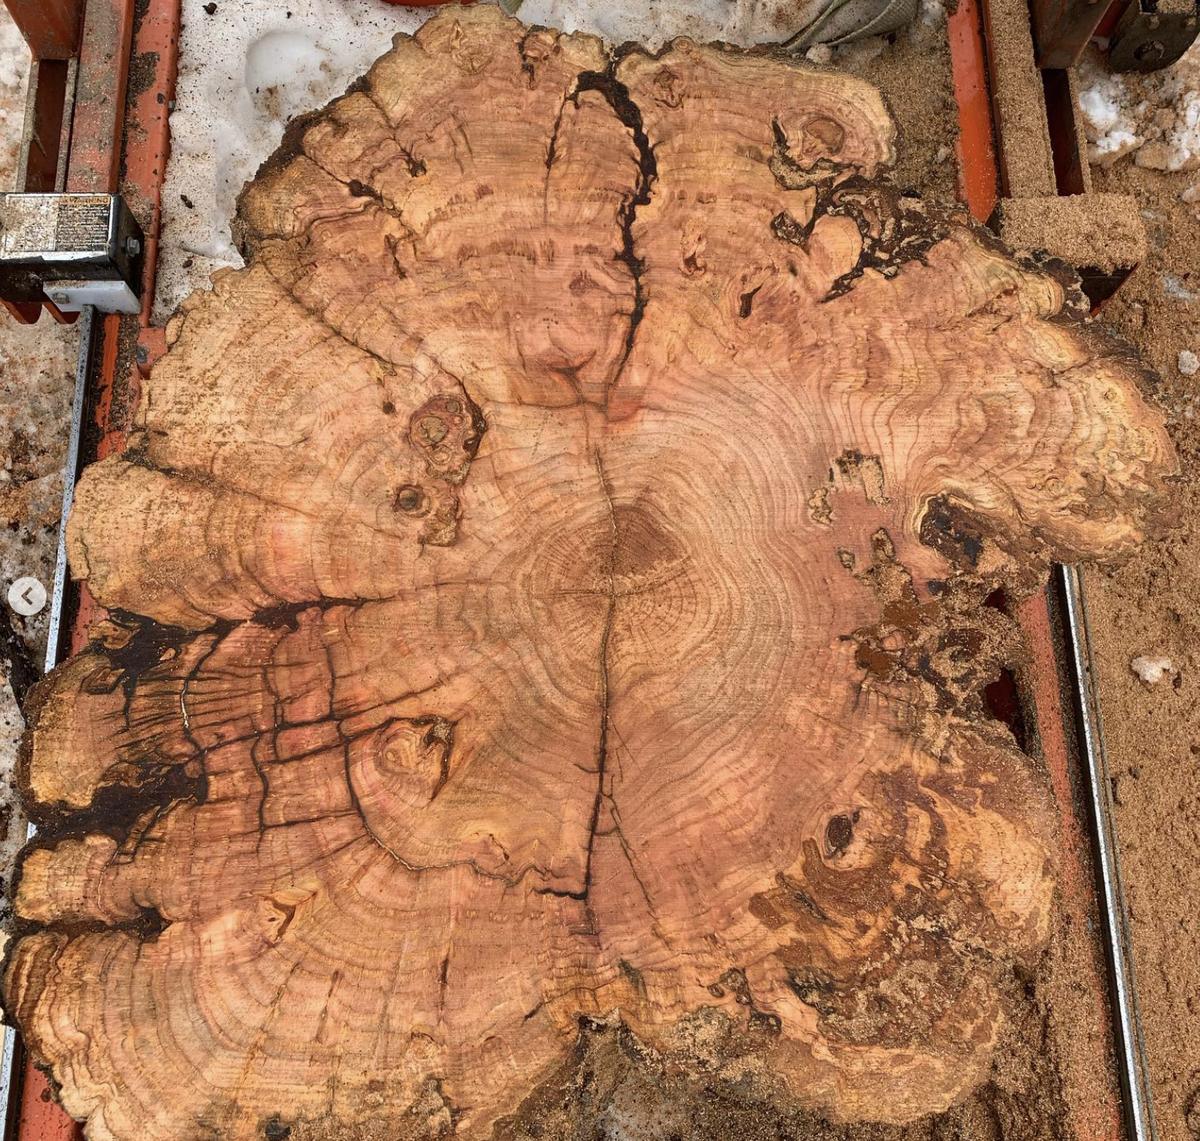
A burl can be sawn two basic ways. A slab is cut lengthwise, along the trunk, so its faces are mostly long grain. A cookie is a cross-section cut across the trunk, showing the full outline of the burl and its growth rings, like the piece pictured at the top of this page.
Cookies are dramatic, but their faces are largely end grain. End grain gives up moisture much faster than long grain, and as a cross-section shrinks it tends to split along radial lines running out from the center. Long-grain slabs through a burl are generally more forgiving. Both make beautiful work; the point is to know which you are buying and to expect a cookie to need more stabilizing.
How do you choose a good burl?
- Ask about moisture. A burl that has been properly kiln-dried or fully air-dried is far more predictable than a freshly cut one. If you own a moisture meter, check a few spots and compare the readings to your shop. Our article on why kiln-dried slabs matter covers target moisture content and acclimation.
- Look at both faces and every edge. Figure on one face does not guarantee figure on the other, and defects often hide on the underside.
- Read the cracks. Small, tight checks are normal in burl and easy to stabilize. Cracks that run all the way through, or that look fresh and sharp-edged, deserve a closer look and a plan for keys or epoxy.
- Probe for soft spots. Press suspicious areas with a fingernail or awl. Punky, crumbly wood needs to be cut away or consolidated, while bark inclusions and small voids are part of a burl's character.
- Measure net thickness. Burls rarely come off the saw perfectly flat, and flattening costs thickness. Leave room for that loss when you plan the part. Our guide to choosing slab size explains how to measure usable dimensions.
- Match the piece to the project. Small burl offcuts suit boxes, inlays, knife scales, and turning blanks. Larger slabs and cookies suit tops, bench seats, shelves, and wall pieces.
How do you stabilize cracks, voids, and bark inclusions?
Nearly every burl needs some stabilizing before final flattening. Work in this order: rough-flatten so you can see the defects clearly, fill and reinforce, let everything cure fully, then take the final flattening passes.
- Clean out the defects. Pick out loose bark, dirt, and soft material with a dental pick, wire brush, or awl, then blow out the dust. Fills only hold to sound wood.
- Wick thin CA glue into hairline checks. Thin cyanoacrylate soaks into fine cracks and loose eyes and hardens them in place. Work in a ventilated area and wear eye protection.
- Fill larger voids with epoxy. Seal the back of through-holes with packing tape, mix a slow-curing epoxy, and fill slightly proud of the surface. Deep voids may need several pours; follow the maximum pour depth the epoxy maker lists to avoid excess heat and cracking. Clear epoxy shows the void, while black or tinted epoxy turns it into a dark accent.
- Bridge active cracks with butterfly keys. A crack that could keep opening is best held with keys set across it on the underside or as a visible detail on top. Our guide to caring for and finishing live edge slabs touches on when keys make sense.
Turners sometimes go a step further and vacuum-stabilize small burl blanks with a heat-cured resin that soaks all the way through the wood. It is a specialty process best suited to pieces small enough for a vacuum chamber.
How do you flatten and smooth burl without tear-out?
Because burl grain runs in every direction, any blade or cutter is always cutting against the grain somewhere. A thickness planer can tear out chunks or pluck whole eyes from the surface. If a small piece fits and you choose to plane it, use freshly sharpened knives and take very light cuts, around 1/32 inch or less, and watch closely for chip-out.
For wider pieces, a router sled is the usual answer. Take shallow passes, keep the surfacing bit sharp, and run it toward the lower end of its speed range. Our step-by-step guide to flattening a slab with a router sled walks through the setup. A drum sander is another good option because it abrades rather than cuts, so it handles wild grain gracefully.
Smoothing is where patience pays off. A sharp low-angle block plane can tame small areas, but a card scraper is the real workhorse on burl, shaving the surface without lifting fibers. Many makers sand to around 120 grit, scrape, then sand lightly through the higher grits. Wipe the surface with mineral spirits between grits to reveal scratches and tear-out before finish makes them permanent. If an eye loosens, drop thin CA into it and sand it flush once cured.
How do you finish burl wood?
Burl is full of tiny patches of end grain, and end grain drinks finish. Applied straight to bare wood, a stain or oil can leave dark, blotchy areas next to lighter ones. A thin seal coat, such as dewaxed shellac or a finish thinned well with its solvent, evens out absorption and gives you a more uniform result.
Penetrating oils deepen color and bring out the shimmer that makes burl figure come alive. On pieces that will see handling or spills, follow the oil with a durable film finish once it has fully cured. Eyes and open pores can be filled with extra coats of finish, sanded back between coats, or with a skim of epoxy for a glass-smooth surface. Finish both faces and all edges the same way so the wood exchanges moisture evenly, and always test your full finish schedule on an offcut or the underside first.
What mistakes should you avoid with burl wood?
- Buying a burl without checking its moisture content or how it was dried
- Expecting a burl cookie to behave like a long-grain slab
- Filling cracks before cleaning out loose bark and punky wood
- Taking heavy planer or router passes that pluck out eyes
- Pouring epoxy deeper than the product is rated for
- Skipping the scraper and sanding until figure blurs and edges round over
- Oiling bare burl without testing, then discovering blotchy end grain patches
- Finishing only the top face and leaving the underside bare
Looking for a burl with real figure? Browse kiln-dried slabs and burls in the shop, see finished work in the gallery, or come see the wood in person at the yard in Sharon, VT. Not local? We ship freight to the contiguous 48 states; the shipping page has the details.
FAQ: working with burl wood
What causes burls on trees?
Burls form when a tree responds to stress such as an injury, insect activity, or a fungal or bacterial infection, though the exact trigger is often unknown. The growth is a dense mass of dormant buds, and the grain twists around each one, creating eye and swirl figure.
Is burl wood stable?
Properly dried burl is workable and holds up well in furniture, but its grain runs in every direction, so it can move unpredictably and check, especially in cross-section cookies. Buy dry stock, let it acclimate to your shop, stabilize cracks, and finish every surface.
Are burl cookies more likely to crack than burl slabs?
Yes, in general. A cookie is cut across the trunk, so its faces are mostly end grain, which loses moisture quickly and tends to split along radial lines. Slabs sawn lengthwise through a burl are mostly long grain and usually more forgiving.
Why is burl wood so expensive?
Burls are uncommon, irregular in shape, and slow to dry without cracking, and much of each one is lost to bark, voids, and defects. The yield of usable, highly figured wood is small compared with an ordinary log.
Can you run burl through a planer?
Small pieces can be planed with very sharp knives and very light cuts of about 1/32 inch or less, but tear-out and plucked eyes are common. Wider pieces are better flattened with a router sled or drum sander, then smoothed with a card scraper and sandpaper.
How do you fill cracks and holes in burl wood?
Clean out loose bark and soft material first. Wick thin CA glue into hairline checks and loose eyes, fill larger voids with slow-curing epoxy in pours no deeper than the product allows, and bridge cracks that could keep opening with butterfly keys.
What is the best finish for burl wood?
There is no single best finish, but a thin seal coat such as dewaxed shellac helps prevent blotchy end grain patches. Penetrating oil brings out the figure, and a durable film finish over cured oil protects surfaces that see regular use. Test on an offcut first.